The guitar is one of the most popular and pleasing of all musical instruments. In addition, it is cheap, easy to transport, and is always a success in a group of friends!
For this reason, congratulations! You are making an excellent choice on learning to play the guitar. We have prepared the best content and gathered it in this article, so that you can start to prepare your first chords, and play your first song, in a simple and uncomplicated manner.
So, here starts your first classic guitar lesson. The first steps for beginners are the following:
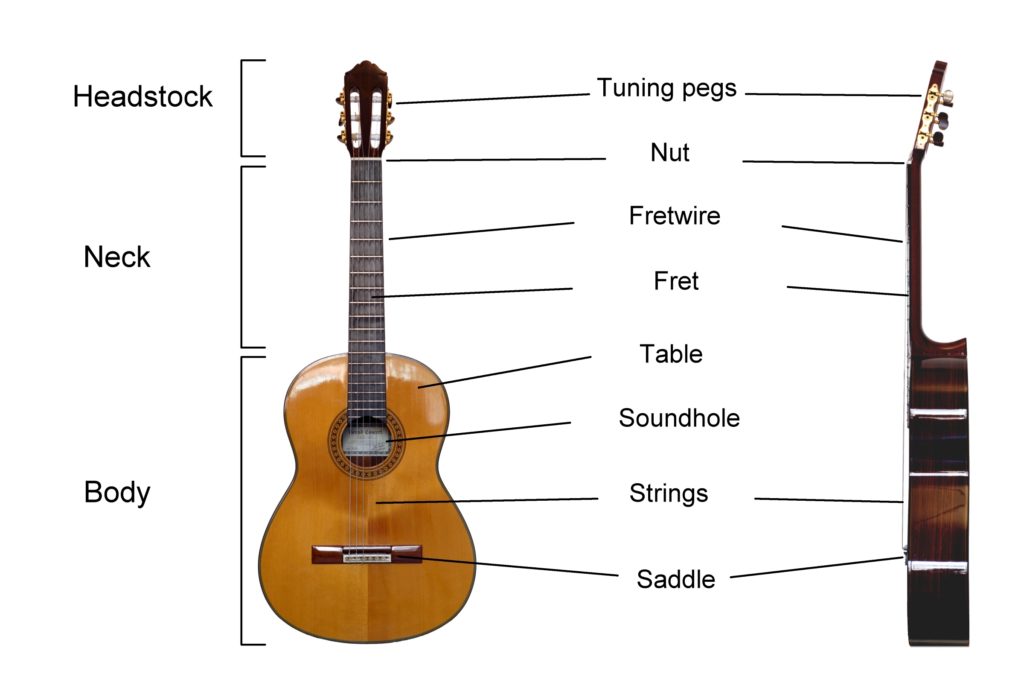
#1 Know the parts of the instrument
You do not need to learn the names of all the components, but learning at least the most important parts is very important, so that you will be able to follow a guitar lesson.
#2 Choosing the right guitar
There are basically two types of guitar: that made of nylon and that made of steel. For beginners, we recommend starting to play with a nylon guitar, as nylon is softer and makes execution easier (you do not need to press the strings with so much strength). This choice shall make your studies much easier.
It is possible to buy a good nylon guitar for beginners in the price range between US$ 50,00 and US$ 100,00 (you do not need to invest too much in the beginning. First, learn to play simple pieces of music with a study guitar and then, when you are more experienced, choose a guitar that better meets your new musical desires).
#3 Learn to hold the guitar before you play it
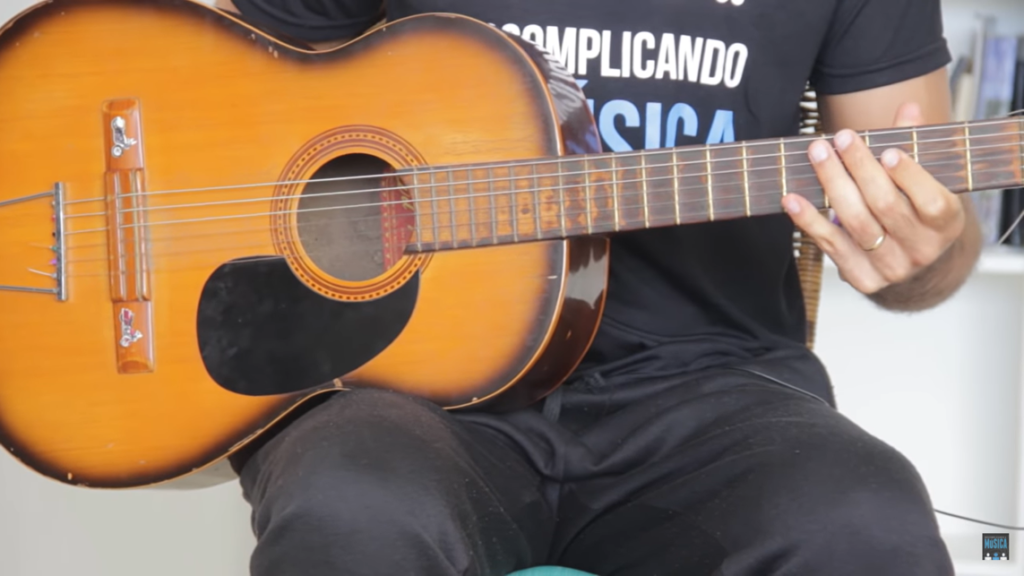
You can hold the guitar on either your right or left leg. Placing your guitar on your left leg is more recommended for those who wish to play classical music; however, most guitarists, especially those playing pop music, will hold the guitar on the right leg, slightly inclined to allow a satisfactory posture of both hands.
For this reason, we advise you to start by placing the guitar on your right leg.
Try to keep your chest straight, to allow good breathing and free movement of your arms, as shown in the picture below:
#4 Look at the numbering of the fingers
The numbering of the fingers as used for the left hand is the following:
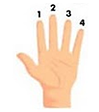
Notice that the fingers are numbered from 1 to 4, starting with the index finger (number 1) out to finger number 4. This numbering system is very useful to show the formation of chords, showing which finger should press each string in each fret. This will soon be much clearer, when we set up the chords with the left hand.
#5 Play with the left hand for the first time
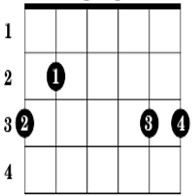
The left hand (for right-handed people) is responsible for establishing the chords and the notes. The definition of a chord is different from that of a note, as a chord is the union or blend of many notes played at the same time (while a note is the minimum element of sound). A chord can be represented as follows:
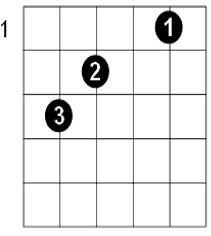
Here, the numbers on the strings represent the fingers of the left hand, based on the numbering system we have already seen in step #4. These fingers should press the respective strings in the respective frets shown in the figure. The number to the left of the drawing (highlighted in green below) informs where, or which fret of the instrument, that particular chord should be executed:
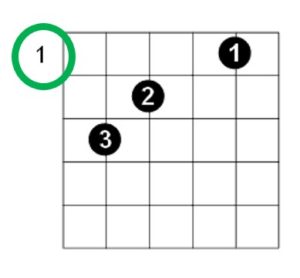
In this case, we are playing the C major chord, where the first note is played using the first fret of the guitar. Let us now look at how this very same chord would be put together using the guitar with the left hand in practice:

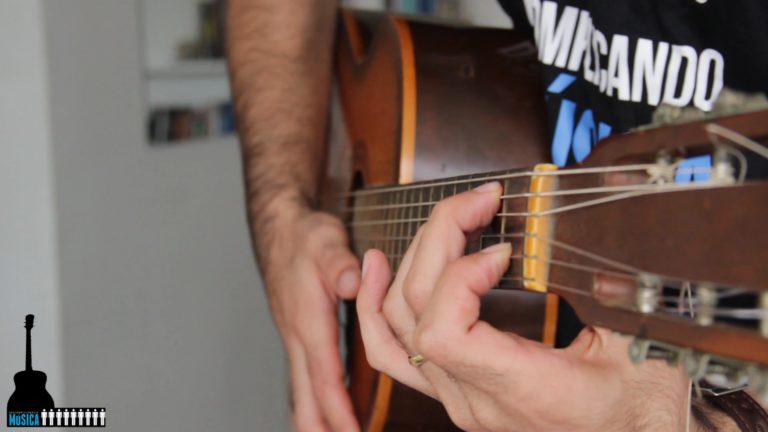
To be able to position your fingers in this way, the ideal situation would be for your thumb to be in the following position:

Notice that there is a need for a bit of strength when pressing your fingers onto the strings, so that the sound may be clean and clear. It is quite normal for you to feel a bit of difficulty to make your first chord, because, if you are not accustomed to using your fingers to play the guitar, your brain is not yet able to optimise position and pressure. However, this is a technique that you are sure to master in a jiffy, if you practice.
After a few days making your first chords using your left hand, the fingers will then get used to the correct strength and you will then be able to extract perfect sound, without much effort, and this will then be as easy as pie. Do not give up!
*Note: An interesting tip would be to try to put the chords together close to the fretwire, to make the process easier and to require less strength.
Another important detail is that of positioning the fingers in a “hook” formation, to prevent the fingers accidentally touching other strings. This is shown in the illustration below:
Regarding the numbering of the strings of the guitar, the correct way is to count from the bottom up (the string with the highest pitch is the first, while the lowest-pitched string is the 6th). The note for each string is shown in the table below.
- 1st string: E
- 2nd string: B
- 3rd string: G
- 4th string: D
- 5th string: A
- 6th string: E
*Remark: Note that there are two strings corresponding to E notes, one low pitch and one high. This is because they are in different octaves. To understand the concept of an octave, please read this article.
#6 Compose your first chords and learn basic chord notation
Sometimes it may seem difficult to know how to really play the guitar (practical part, free of any theory) but you need to understand that playing the guitar is essentially a matter of making chords with your left hand at the same time when you make rhythm with your right. This means that, in order to play the guitar, you need to memorize some basic chords in the left hand and at least one rhythm (or beat) in your right hand, to be able to play a full song. In this process, the most advisable course of action is to learn the basis with your left hand first, and then slot in your right hand, in a co-ordinated manner.
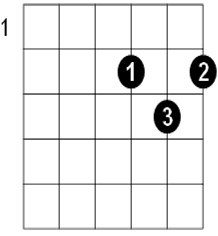
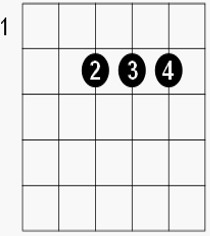
Now that we already know how to place our left hand correctly, we now need to get to know the most common chords used with the guitar. With these chords, you shall already be able to play thousands of songs, which means that it is important to try to assemble each one of them and memorise its formation, so be agile when changing from one chord to another.
In step #5 we learnt how to play the C major chord. Below, we present other important chords so that you can already memorize them (below each chord we show its name, and its chord letters in brackets):
Notice that each notation of the chords is represented by a letter, as in the list that follows:
- C –> do
- D –> re
- E –> mi
- F –> fa
- G –> sol
- A –> la
- B –> ti
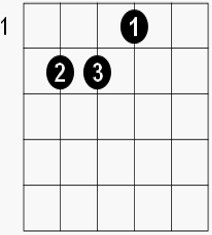
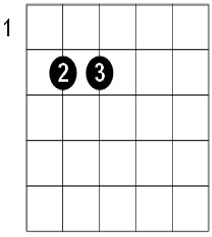
This is the notation for the major chords. In the case of the minor chords, these have an additional “m” beside the letter. For example: Em (E minor). Below you will see the difference of chords between E major and E minor:
While executing a song, you need to be able to change from one chord to another relatively quickly. So, start off by changing one chord after another, as quickly as you can.
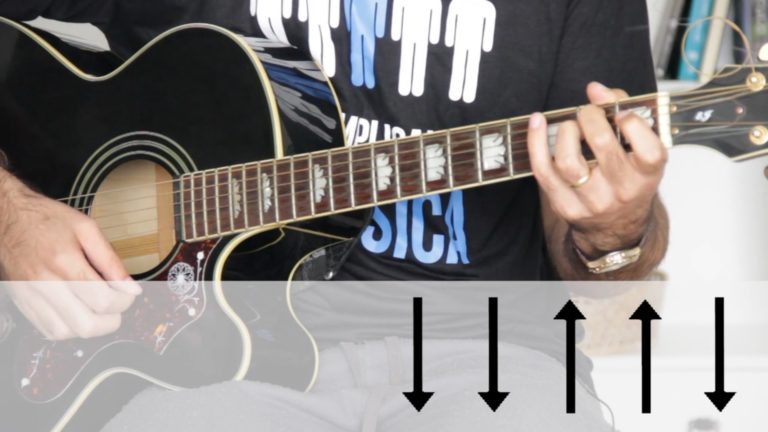
#7 Learn how to play with your right hand
The right hand is responsible for the rhythm (beat) of the music. While the left hand is performing the chords, the right hand sets the rhythm. The two elements together make the harmony of the song. To better understand the difference between melody, harmony, and rhythm, please read this article.
The right hand makes upward and downward movements. These movements are represented by arrows. On seeing the arrows and knowing the song, you are able to follow the rhythm and make the beat as the music dictates. Next (in step #9) we shall learn how to apply all this in practice. In the meantime, notice that the notation about whether to play upwards or downwards is the following:
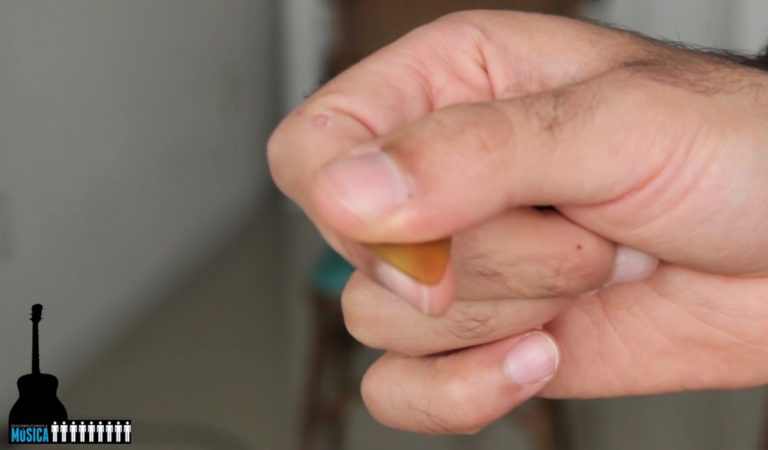
#8 Choose between playing with or without a pick
To play the guitar, you can use a pick (recommended for faster and more active rhythms, and more importantly when steel guitars are used) or play without a pick. When we do not use a pick, it is possible for us to pay rhythms that go up and down, and songs with fingering, which is another interesting technique.
The correct way of holding a pick is: place the pick parallel to your index finger, and then press your thumb as if holding tweezers. Please refer to the image below, which makes the process easier to see:
#9 Play your first complete song
To play a song, you must synchronise your left hand with your right, changing chords as you make the rhythm with your right hand.
*Remark: The ideal situation is that of knowing how to tune the guitar so you will be able to play it, but nowadays you can tune a guitar with any mobile phone application, touching one string at a time and either tightening or loosening the strings (using the tuning pegs) as recommended by the app. Later, you can also learn to tune a guitar by ear, but do not worry too much about this right now.
#10 Organise your study for progress
Playing the guitar is an art that requires dedication. In fact, this is no different from any other musical instrument in this regard: there is a need to set some time aside for practice. However, there is no need to worry, as it is a mistake to think that you need hundreds of study hours every day to improve. With only 10 or 15 minutes a day, it is possible to see a lot of progress, and within the space of a few weeks you will already feel like a musician.
To organise your study schedule, first of all you must understand that frequency is more important than intensity. This means that it is better to play the guitar for 15 minutes every day, seven days a week, rather than play for 6 hours one day a week.
Try to set aside a set time every day for guitar practice, and know what to train before even picking up the guitar, to avoid wasting time.
The ideal situation in this case is to have a study schedule, knowing exactly what to study, and the step-by-step process to be followed, with targets, to develop one day after the next. Without this, you could feel a bit lost, and even give up.
It’s also important to understand music theory. Our complete e-book, with 12 modules and more than 350 pages, explains everything from the basics to advanced topics in a simple, easy-to-understand way. Learning music has never been so easy!